 By Graham Fisher
Updated November 2026
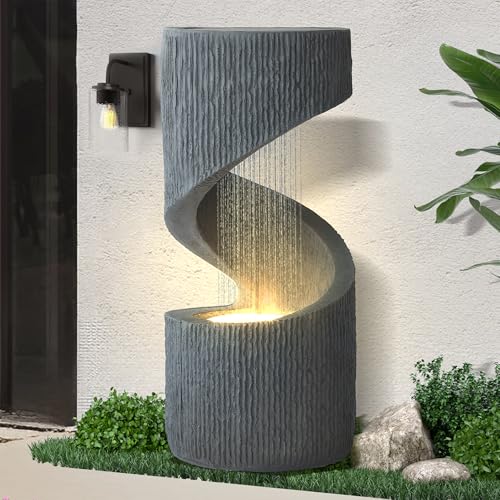
Art in garden design means treating sculpture, mosaics, found objects and decorative pieces as structural parts of the landscape rather than afterthoughts. Done well, a piece of art gives the eye a destination, sets a mood and ties together planting, paving and lighting. This guide walks through how to choose, place and support garden art so it looks deliberate in every season.
Step 1: Decide What Role the Art Will Play
Before buying anything, decide whether the piece is a focal point, a accent or a transition. A focal point should be visible from the main window or the entry path and can be larger, around one-third the height of the nearest tree or wall. Accents are smaller pieces, often 12 to 24 inches tall, tucked into beds or along edges. Transitional pieces, such as a set of stepping-stone medallions, guide movement from one zone to another.
Shopping for one? See our guide: Design Toscano Garden Gnomes Review: Bigfoot Yeti Statue Pros and Cons.
Step 2: Match Scale and Material to the Space
Scale is where most garden art succeeds or fails. A 4-foot bronze in a 10-by-10 courtyard will dominate, while a 10-inch ceramic bowl disappears in a large lawn. Stone and metal hold up in exposed spots, while wood and fabric need sheltered placement. Consider how the material ages too: copper develops a green patina, and untreated steel can rust in a way some owners want and others do not.
Step 3: Place Art Along Sightlines
Stand at the spots you use most, such as the back door, a bench or the kitchen sink, and note where your eye naturally lands. Place the piece at the end of a path or within a planting bed that frames it. A common rule is to set the art slightly off-center, roughly at the intersection of thirds, so the composition feels relaxed rather than symmetrical by accident. For more on structuring the layout around these lines, see Symmetry in Garden Design: 7 Steps to a Balanced, Formal Layout.
Step 4: Build Backdrops and Frames
Art needs a background that makes it readable. Dark evergreen hedges make pale stone or white ceramic stand out, while a sunlit wall can silhouette a metal form. A wall or screen can also act as a stage. Wall for Garden Design: 7 Steps to a Wall That Frames Your Yard covers how to build one that suits a piece. Leave at least 3 feet of clear space around a sculpture so it can be seen from more than one angle.
Step 5: Use Plants to Support the Piece
Plant choices should echo the art’s color, texture and form. A tall, spiky sculpture pairs well with rounded grasses, while a smooth stone form benefits from fine-textured perennials. The approach works especially well in small spaces, as covered in Small Yard Garden Design: 6 Steps to a Layout That Feels Bigger. Keep plants 18 to 24 inches from the piece at maturity so foliage does not hide its outline.
Step 6: Plan Lighting for Evening
Many pieces change completely after dark. Use low-voltage uplights placed 6 to 10 feet from the art, angled to graze the surface rather than shine straight into the eye. Downlights from a nearby branch create dramatic shadows. Test your plan at dusk before committing to fixtures. Check local codes and consult a licensed electrician for any wired installations.
Step 7: Maintain and Rotate
Inspect pieces seasonally for loose joints, cracks and algae. Rotate smaller items every season or two to keep the garden feeling fresh. Seasonal planting around a permanent sculpture gives you new combinations without new purchases.
Checklist Before You Install
- Role defined: focal point, accent or transition
- Scale measured against the nearest tree, wall or bed
- Material suited to exposure and maintenance tolerance
- Sightlines tested from primary windows and seating
- Backdrop or frame planned with at least 3 feet of clearance
- Lighting tested at dusk, with power routes confirmed
Common Mistakes
- Choosing art by size in the store rather than measuring the actual site.
- Placing every piece on the same axis, which flattens the design.
- Ignoring evening views and leaving pieces in darkness.
- Planting shrubs that quickly grow over a sculpture.
- Using too many competing pieces; one or two strong ones usually read better than six.
Recommended Gear
- Low-voltage landscape lighting kit: Provides even, adjustable uplighting for evening display of sculptures and statues. View on Amazon
- Heavy-duty garden anchor stakes: Keep lightweight decorative pieces from tipping in wind. View on Amazon
- Outdoor-rated metal or stone sealant: Protects finishes from moisture and staining. View on Amazon
FAQ
How big should a garden sculpture be?
A focal sculpture often works best at about one-third the height of the nearest tree or wall. Smaller accents usually sit between 12 and 24 inches tall. Always mock up the size with cardboard or a stake before buying.
Can I use found objects as garden art?
Yes, as long as they are weather-resistant and safe. Reclaimed metal, ceramic shards and weathered wood can work well. Avoid sharp edges in areas where children or pets play.
Do I need a professional to install heavy art?
For pieces over a few hundred pounds or those requiring concrete footings, consult a landscape contractor or structural professional. Heavy installations can shift soil and damage utilities if not planned carefully.
Conclusion
Art in garden design works best when every piece has a clear role, a suitable scale and a supporting backdrop. Plan sightlines, plant with restraint and light the piece for evening. A few well-placed works will do more for your yard than a crowded collection.
Related reading
- Zen Garden with Fountain: A Step-by-Step Design Guide
- Wood Garden Gates Design: 7 Steps to a Gate That Lasts
Ready to choose one?
About Graham Fisher
Graham Fisher is part of our editorial team and reviews and edits our garden design & decor guides, checking product details against manufacturer specifications and owner feedback.