 By Graham Fisher
Updated November 2026
Making a garden fountain using pots is one of the most approachable ways to add moving water to a yard without pouring a concrete basin. You stack two or three containers, run a small submersible pump through a hidden channel, and let water spill over the rims into a reservoir below. This guide walks through choosing pots, sizing the pump, assembling the stack, and placing the finished piece so it looks intentional rather than improvised.
What You Need to Know Before You Start
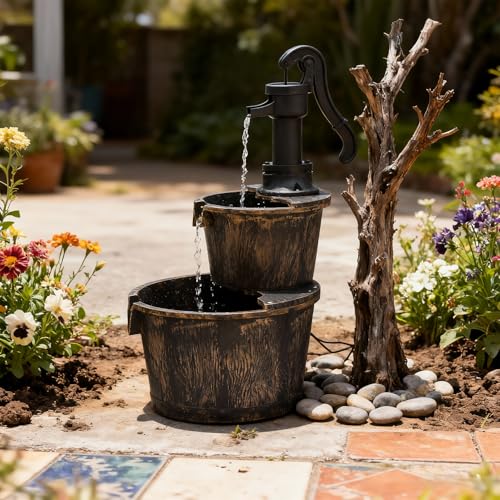
A pot fountain is essentially a gravity-fed waterfall. The pump lifts water from a basin to the top pot, and the water drains down through the tiers, returning to the reservoir to be recirculated. Once you understand that loop, the design decisions become simple: the pump has to lift the water high enough to clear the top pot, and every pot has to be sealed or drained in a way that keeps water where you want it.
Shopping for one? See our guide: 7 Best Garden Pot Water Fountains for Every Yard (2026).
Most home-scale pot fountains use one of three layouts:
- Single-basin: one large pot or a half-barrel that doubles as the reservoir, with a stacked pot on top.
- Tiered stack: two to four pots of decreasing diameter, each spilling into the one below.
- Side-spill: a tall urn with a notch or drilled hole that sends water down the outside.
The tiered stack is the most forgiving for beginners and the one this guide focuses on, though the same principles apply to the other layouts.
Choosing the Right Pots
Pot material matters more than most people expect. Lightweight plastic is easy to move but can crack under freeze-thaw cycles. Glazed ceramic looks elegant but must be fully sealed and kept off hard frost. Concrete and fiberglass hold up well outdoors and are heavy enough to stay put in wind.
For the reservoir, choose a container with at least 10 inches of depth and a diameter wide enough to hide the pump. Manufacturers of submersible fountain pumps commonly recommend a reservoir holding several times the pump’s rated flow per minute so the water is not drawn down too quickly, though you should check the specific pump’s documentation for exact figures.
For the upper tiers, pick pots with a smaller footprint than the one beneath, so water falls into the lower pot rather than running down its outer face. A common proportion is each tier about 20 to 30 percent smaller in diameter than the one below.
Checking Drainage and Sealing
Any pot in the stack that will hold water needs either a drain hole or a clean, intentional overflow. Plant pots with drainage holes will leak through the bottom, so plug those holes with silicone-safe sealant or use a basin without holes in the reservoir. The upper pots usually work best as open spill bowls, so the water runs over the rim rather than accumulating.
Sizing and Selecting the Pump
The pump is the heart of the fountain. Submersible pumps are rated by flow rate (gallons per hour) and maximum lift (feet). Measure the vertical distance from the water surface in the reservoir to the top of your highest pot, then add a margin. Choose a pump whose maximum lift is comfortably above that number, since pumps run less efficiently near their limit and wear out faster.
Flow rate controls the sheet of water. A modest pump gives a gentle trickle; a stronger one produces a visible cascade. For a two-tier stack about 3 feet tall, a small pump in the low hundreds of gallons per hour is usually enough to create a steady spill without splashing out of the pots.
Pump Sizing Checklist
- Measure total height from the reservoir water line to the top pot rim.
- Add 6 to 12 inches of safety margin to that figure.
- Select a pump with a maximum lift rating above that total.
- Confirm the flow rate suits the number of tiers and the look you want.
- Check that the pump has a cord length that reaches a GFCI-protected outlet, or plan for a low-voltage solar option.
Step-by-Step Assembly
Step 1: Set the Reservoir
Dig a hole slightly larger than the reservoir pot so its rim sits flush with the soil or a few inches above it. Place a bed of coarse sand or gravel at the bottom for drainage and a level base. Check level in both directions with a small spirit level before continuing.
Step 2: Position the Pump
Set the pump on a brick or flat stone inside the reservoir so the intake is not sitting on the bottom, where sediment would clog it. Run the outlet tubing up the inside of the stack or through a hollow center pipe, and secure it so it cannot slip out.
Step 3: Stack the Tiers
Center each upper pot on the one below. Use a small bed of mortar, outdoor-rated construction adhesive, or a spacer of cut stone to level each tier. Leave a small gap at one edge of each pot if you want a more visible, sheeting water flow. The tubing should exit the top pot and feed a distribution bowl or a simple spout.
Step 4: Connect the Water Line
Fill the reservoir with clean water. Plug in the pump through a GFCI-protected outlet or connect the solar panel, then start the pump and watch the water rise and fall through each tier. Adjust the tubing or flow valve until the spill is even across the rim, and make any necessary height adjustments now, before the pots are filled.
Step 5: Add the Finishing Touches
Place decorative stones, pebbles, or a few water-tolerant plants around the base to hide the reservoir edge. A thin layer of pebbles over the reservoir surface also reduces evaporation and keeps the pump intake clear of debris.
Placement and Design Tips
Place the fountain where you can hear it from a seat or window, but not directly next to a patio where splashing will soak furniture. Keep it within reach of an outdoor electrical outlet or plan the cable run before you dig. A spot with partial shade slows algae growth, and a spot out of the prevailing wind keeps water inside the pots.
For a visual approach that suits pot fountains, a cottage-style yard looks natural with mismatched terracotta or weathered stone tiers, while a modern garden works best with matching glazed or concrete pots in a clean line. For more on choosing textures that complement stonework and planting, see Using Texture in Garden Design.
Common Mistakes
- Undersized pump: the fountain sputters or stops when the top pot empties. Always size for maximum lift, not just the height you measured.
- Pump sitting on the bottom: sediment blocks the intake and the motor overheats.
- Leaking drain holes: water loss is constant and the pump runs dry. Seal or plug holes in the reservoir.
- Freezing pots left full: water expands and cracks ceramic or plastic. Drain and remove the pump before a hard freeze in colder climates.
- Skipping GFCI protection: any outdoor electrical connection near water needs proper protection. If you are unsure about wiring, consult a licensed electrician.
Recommended gear
A small number of supplies make the build far easier. A submersible pump rated for your total lift is the most important purchase. Look for a pump described as suitable for outdoor fountain use and check its maximum head height before buying. View on Amazon
Vinyl or silicone tubing sized to the pump outlet keeps the water line clean and easy to route. Choose a diameter that matches your pump fitting so you avoid leaks at the connection. View on Amazon
A GFCI outdoor extension cord or weatherproof outlet cover protects the electrical connection from splashing and moisture. View on Amazon
Outdoor-rated construction adhesive or a pond-safe silicone sealant helps stack the tiers and seal any drain holes you plug. View on Amazon
Tips for a Long-Lasting Fountain
- Clean the pump intake and reservoir every few weeks during the active season.
- Top up water regularly, since evaporation is faster in hot, windy weather.
- Use a small amount of fountain-safe algaecide or a natural pond clarifier if the water turns green.
- Inspect the tubing and pot joints each spring and tighten or replace anything worn.
- If you add plants, choose species that tolerate wet roots and keep them in pots rather than planting them in the reservoir.
FAQ
Can I use any pot for a garden fountain?
Most outdoor pots work, but the reservoir must be watertight or sealed, and the upper tiers should be stable and freeze-resistant. Concrete, fiberglass, and glazed ceramic tend to last longest outdoors.
How tall can a pot fountain be?
Height depends on the pump’s maximum lift and the stability of the stack. Most backyard pot fountains stay under about 4 feet so they remain secure and easy to maintain.
Do I need a pump with a timer?
A timer is optional. It helps reduce run time and energy use, and it can extend pump life by preventing continuous operation. Many people run their fountains during daylight hours only.
How often should I clean the fountain?
Plan on a quick check every week or two and a full cleaning every month or so during warm months. Frequency depends on sun exposure, debris, and how much the water is used.
Can I run a pot fountain on solar power?
Yes, but solar pumps have lower flow and lift than mains-powered models. Check the pump’s specifications against your height and desired spill. For options, see Top 5 Solar Powered Garden Fountain Picks for Every Yard (2026).
Will mosquitoes breed in the reservoir?
Moving water discourages mosquitoes because the larvae need still water to develop. Keep the pump running and the surface clear, and the risk stays low.
What should I do before winter?
In freezing climates, drain the pots, remove the pump, store it indoors, and cover the stack if possible. This prevents cracking and protects the motor.
Is a pot fountain a good project for beginners?
Yes. It needs no concrete and few specialty tools, though accurate pump sizing and safe electrical connections are important. If you want a ready-made alternative, Garden Fountain Set Up: A Step-by-Step Guide for Beginners (2026) covers that route.
Conclusion
Making a garden fountain using pots comes down to three decisions: choose a sealed reservoir, size the pump for your full lift, and stack the tiers so water spills evenly. Once those are right, the build is straightforward and the result can be as simple or as ornate as your yard calls for. Start with a two-tier design, run it for a week, and adjust from there.
Related reading
- Top 5 Stone Fountains for Garden Settings Compared
- Solar Garden Fountain for Bird Bath Review: Features and Performance
- Solar Buddha Garden Fountain Review: Features and Performance
Ready to choose one?
About Graham Fisher
Graham Fisher is part of our editorial team and reviews and edits our garden design & decor guides, checking product details against manufacturer specifications and owner feedback.